Showing posts with label Meat. Show all posts

Sunday, April 27, 2008

Miso Chicken

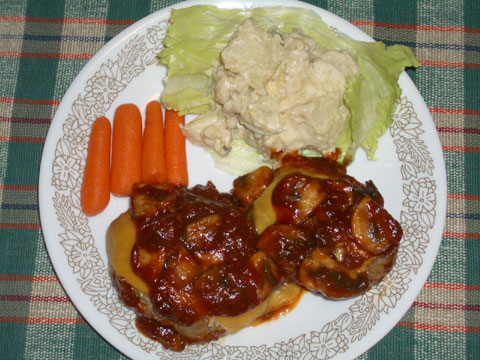
I was craving some chicken, but I didn't want anything greasy. I tried to think of what I could possibly do with chicken breast pieces we had in the freezer, so I tried to bake it with a miso sauce, which turned out to be better than I expected! The photo makes it look like crossaints or some kind of dinner rolls with cheese on them, but it's chicken with special miso sauce.

IN JAPANESE: Tori no Miso Yaki
CATEGORY: Meat
COOKING METHOD: Grilled
DIFFICULTY: Medium
SERVES: 4 people
LENGTH OF TIME: 30 min

INGREDIENTS:
1 lb Thin sliced Chicken breast (about 12 pieces)
2 TBsp of Miso (white would be better, but red is fine, too)
1 TBsp of Sake
1 TBsp of Mirin
1 tsp of Sugar
1/2 tsp of lemon juice

HOW TO:
Pre-heat the oven to 400 degrees.

In a bowl, mix miso, sake, mirin, sugar and lemon juice until you get a creamy sauce.

Lightly grease a baking pan (9x13inch pan), and spread the miso sauce on each side of chicken pieces and spread them into the pan.

Bake for 15-20 minutes until the chicken is cooked. You can cut the fattest piece to see if the juice from the meat is clear instead of red (clear means fully cooked, red means still bloody and raw). That's it!

Tuesday, April 1, 2008

Bacon Wrapped Shrimp

Happy April Fool's day. It seems like Google is playing another April Fool's joke on Gmail. This year, they claim to have a new function that let's you send email with time stamp from the past. If you forget to send birthday wish or anniversary note, you can set your email sent time to whenever, and claim that you did actually sent it. I liked last year's joke better, where they claimed that they can print all of your emails and ship it to you for free.

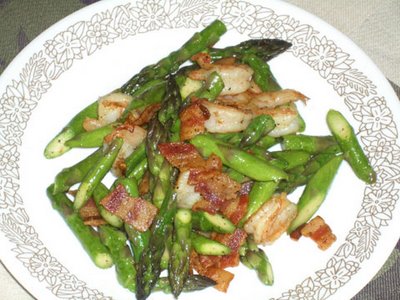
Now, onto today's recipe. This one is super easy, and at the same time super good, and popular at BBQs. Whenever there's a BBQ potluck, we are usually asked to bring this. Bacon wrapped shrimp is a great izakaya menu and goes excellent with ice cold beer. And don't worry, this is a legit recipe (not an April Fool's joke).

IN JAPANESE: Ebi no bacon maki
CATEGORY: Meat, Seafood
COOKING METHOD: Grilled
DIFFICULTY: Easy
SERVES: 4 people
LENGTH OF TIME: 20 min

INGREDIENTS:
16 shrimp peeled (see TIP: Shrimp)
8 slices of bacon
4-8 mushrooms (optional)
8-12 asparagus (optional)
1 TBsp sake (optional)
salt & pepper (optional)

HOW TO:
Cut the slices of bacon into half. The portion of bacon and shrimp should look like the photo here. Place the shrimp on top of the bacon and just wrap it up. If you are going to be using the BBQ grill, I recommend using the toothpick to hold it into place. If not, just place it on baking sheet. Both the shrimp and bacon are salty enough so you don't need to add salt.


If you want some veggies, I recommend grilling some mushrooms and asparagus with the bacon wrapped shrimp. On the mushroom, sprinkle some salt and pepper, and on the asparagus, sprinkle salt and pepper, but also pour a bit of sake (1 TBsp for about 10 asparagus) if you will be grilling in your oven.

If you are using your oven, set it to broil and cook for 5 to 10 minutes until the shrimp and the bacon looks crisp on the outside. If you are using a BBQ grill, both the shrimp and bacon cook much faster (usually 5 minutes will do) so stay by the grill for this one.

Monday, March 17, 2008

Chicken & Daikon in Vinegar Soy Sauce Soup

Happy St. Patrick's Day! Tonight my wife made me corned beef with cabbage and potatoes, and of course, I had some Guinness as well. That was tasty.

During cold winter months, I made chicken and daikon boiled in soy sauce, mirin and sake numerous times. A couple of months ago when I held a potluck party, a friend of mine made chicken and egg boiled in soy sauce and vinegar (and mirin and sake), which tasted quite similar to my chicken and daikon (which I never had the chance to post here). My friend told me that using vinegar makes it healthier and it also makes the meat very tender. He also added that even though there are quite a bit of vinegar in it, you don't really taste the sourness. So, I had to give it a try myself.

IN JAPANESE: Tori to Daikon su nikomi
CATEGORY: Meat
COOKING METHOD: Boiling
DIFFICULTY: Medium
SERVES: 4 people
LENGTH OF TIME: 1.25 hr

INGREDIENTS:
2.5 lb Chicken thighs, drumsticks or wings with bones in it
1 whole daikon (cut in about 1/2 inch thickness)
1 package of Tofu (optional)
2 boiled eggs (optional)
6 cups of water
1 TBsp of Dashi powder (about 6 shakes)
8 TBsp of Soy Sauce
6 TBsp of Vinegar
6 TBsp of Mirin
6 TBsp of Sake
1 clove of garlic chopped in half

HOW TO:
Place the chicken in a large pot and cover that with water and set the burner to medium high. I measured about 6 cups of water, but if you are using smaller chicken pieces or larger pieces, the water you put in should cover most of the chicken. Add the dashi powder (I would say about 1 shake per cup of water you use).

While that pot is starting to cook, wash the daikon, slice it about 1/2 inch thickness. Peel the skin from each of the slices, and cut those in half (so each pieces look like half a circle). This really depends on how big of a daikon you got, but for 4 servings, you should have total of 12-18 of half circle daikon pieces. When you are done cutting them, the water should be boiling, and add the daikon to the pot and lower the heat to low.

Also peel one clove of garlic, and chop that in half and throw that in the pot as well.

By this time there should be some foamy stuff on the top. Be sure to take those out with spoon and throw it out (but try not to take out the oily part as that gives the rich flavor!).

When most of the foamy stuff is taken out (as you continue to cook, more will appear, which you can take out) add the soy sauce, mirin, sake and vinegar. For every cup of water you used, use 1 TBsp of everything, except soy sauce use about 1.25 TBsp. And like I said before, you can hardly taste any vinegar when everything is cooked.

If you want to make this dinner more filling, you can put in some tofu and boiled egg, which I ended up doing.

Put on the lid, make sure the heat is still set to low, and let it simmer for about an hour. Some of the chicken or daikon or anything else you put in may be above the soup, so occasionally stir the pot around so everything can get even amount of flavor soaking.

Saturday, October 7, 2006

Kimchee Pork

August and September were really busy for me. Since I started working in June, and I come home late around 8pm, my wife has been cooking 90% of the time, and on the weekend, we were out on BBQ or outdoor festivals. There were also lots of weddings and we were traveled to Las Vegas, Vancouver and Detroit.

Finally things have slowed down, and we are ready to get back to our normal life. After all those traveling, my wife and I were a bit worn out, so I decided to make some kimchee (kimchi) pork. While I was in Japan, a lot of people told me that if I was feeling weak, I should eat kimchee pork. I never really found out why, but I assumed kimchee gave more energy. Now that I think about it, I recall reading some article about some university in Korea was doing a research feeding kimchee to mice (I'm serious). The study found that mice that ate kimchee on a regular basis were healthier and had much smoother skin. Has anyone else heard about this?

IN JAPANESE: Buta Kimuchi
CATEGORY: Meat
COOKING METHOD: Stir-fry
DIFFICULTY: Medium
SERVES: 2 people
LENGTH OF TIME: 20 min


INGREDIENTS:
5-6 thin sliced pork
Half a container of kimchee (about 7 oz/200g)
5-7 leaves of lettuce (iceberg or leafy, your choice)
1/2 TBsp sesame oil
1/2 TBsp vegetable oil
1 TBsp sake

HOW TO:
Warm up your wok and pour 1/2 table spoon of sesame oil and vegetable oil. I like to mix oils like that since that gives better flavor. Keep the heat to medium-high.

After the oil is well heated, cook the thinly sliced pork until mostly cooked (when not much pink is seen), and then add a tablespoon of sake. This will keep the pork from becoming too tough.

While the sake is still evaporating, add kimchee to the wok. If you have the kind that came with a lot of juice, pour some of those in for more flavor.

When the kimchee is mostly heated, add leaves of lettuce teared into size of your palm (remember they shrink a lot, so you don't need to tear them too small!). Lettuce only needs abuot a minute to cook, so mix well quickly so the kimchee flavoring is spread throughout the wok.

Serve with a bowl of rice and get energized! But remember to have some gum or Altoids afterwards since it can leave quite a stench in your mouth!

Monday, July 31, 2006

Japanese Hamburger

There was another food festival this past weekend; Ballard Seafood Fest. It was similar to Bite of Seattle with similar food stands, but at a much smaller scale. I enjoyed BBQ shrimp, crab clam chowder, and grilled salmon. I didn't see any raw oyster though. My wife told me that people have been getting sick from oysters from Puget Sound this season. The warmer weather is causing virus to grow inside oysters, apparently. That's too bad.

Last week, I introduced Italian fried rice, so this weekend I thought I would make Japanese hamburger. The photo didn't turn out that appetizing, but this is probably my wife's favorite dish.

IN JAPANESE: Hamburg
CATEGORY: Meat
COOKING METHOD: Grilled
DIFFICULTY: Difficult
SERVES: 4 people
LENGTH OF TIME: 45 min

INGREDIENTS:
[burgers]
3/4 lb beef
1/4 lb pork
1/2 onion chopped
1 egg (mixed with a pinch of salt)
1 cup bread crumbs
1 tsp soy sauce
1/4 tsp pepper
1 clove of garlic chopped
1 half inch piece of ginger (see TIP: Ginger)

[sauce]
1/2 cup of ketchup
2 TBsp Bulldog Sauce
2 TBsp sake or white wine
1 TBsp butter
3 mushrooms sliced
1 clove of garlic chopped

HOW TO:
Chop half an onion and a clove of garlic into tiny pieces and add that into a bowl along with all the ingredients listed on the [hamburger] list, EXCEPT for the breadcrumbs. Mix well with your hands (be sure they are clean!) I use the mixture of beef and pork since that creates more fluffy juicy burger. But if you don't eat pork, then you can omit using it.

After everything is mixed well together, add a cup of breadcrumbs. This time, mix gently so the breadcrumbs will stay as fluffy as they can without mashing everything up.

Grab about half of tennis ball in your hand, and toss it back and forth from one hand to the other to make sure the air escapes from the mixture. After a few tosses, make it flat into burger shapes. Depending on your preference, you could make four fairly big patties or six tiny pieces (my wife prefers small ones, so she can eat two instead of one big one).

Set the pan on medium high with a table spoon of vegetable oil. Once the oil is hot, place the burgers on the pan, let them cook for a few minutes until one side turns brown. Lower the temperature to low, flip your burgers, and place the lid, and let them cook for about 10-15 minutes or until the burgers are fully cooked.

If you are in a hurry, after flipping the burgers, you can pour hot boiling water about half way full on the pan, and place a lid. That would steam the burgers and cook them faster. When most of the water has evaporated, your burgers should be done.

SAUCE:
Set your burgers aside, and on the same pan (if there are leftover grease and meat pieces, even better), add butter and diced up garlic on medium heat. After the garlic pieces tunr slightly brown, add sliced mushroom, and let it cook for a few minutes until they look cooked.

Lower the heat to low, and add the rest of the ingredients (ketchup, Bulldog sauce and sake) and stir until everything is well mixed.

Place the bugers back in the pan. If you want cheese over them (I recommend chedder), put a slice on top of burgers, and cook with the sauce on low heat until the cheese melt.

Tuesday, July 4, 2006

Broccoli & Beef

It's been a week since I started working in downtown Seattle. With my new job and World Cup game, I haven't been cooking much. We've been going to George & Dragaon pub to watch the repeat broadcast (the pub records the game to show in the evenings) almost every night. So we've been eating typical bar food like burgers, fish & chips and chicken strips. Watching the games and drinking beer is exciting, but my stomach has not been happy recently.

During my trip to Europe, I realized along with my Japanese-American friend and Korean-German friend that when you are raised eating rice all the time, your body craves rice after not eating it for three days. We liked the food in Europe, but every three days or so, we found ourselves at a Chinese restaurant or Japanese restaurant just to eat some rice. It was easier in Spain since we could satisfy our need for rice from paella. My wife, who is American thinks if you are in a foreign country on a vacation, you should eat their local food. I completely agree, and as much as possible, I do try all the local goods, except my stomach needs rice once every three days or so. I wonder if this kind of thing happens to other people. Do Italians feel like they need to eat pasta at least twice a week?

Today is Fourth of July here in the States, and we will be going to a BBQ (I don't think there will be rice), so I cooked broccoli & beef for lunch. That's a popular dish at a Chinese restaurant, but it's easy to make, so here it is.

IN JAPANESE: Gyuniku to broccoli itame
CATEGORY: Meat
COOKING METHOD: Stirfried
DIFFICULTY: Medium
SERVES: 2 people
LENGTH OF TIME: 15 min

INGREDIENTS:
5-6 thin sliced beef
1 head of broccoli
1/4 onions
some carrots (optional)
some mushrooms (optional)
1 clove of garlic finely chopped
1/2 TBsp sesame oil
1/2 TBsp vegetable oil
2 TBsp oyster sauce
some pepper

HOW TO:
Warm up your wok and pour 1/2 table spoon of sesame oil and vegetable oil. I like to mix oils like that since that gives better flavor.

After the oil gets hot, cook the finely chopped garlic until the garlic flavor soaks into the oil (should be about a minute when the garlic pieces turn slightly brown).

Throw in all the vegetables and stir fry for about a minute, and then add the slices of beef to the wok.

When the beef is 90% cooked, pour the oyster sauce and some pepper into the wok and stir fry for about a minute more until all the sauce is evenly mixed with the beef and vegetables.

That's it! And serve with rice.

Wednesday, June 7, 2006

Asparagus & Bacon

After a couple of months of sending out resumes and interviews, I finally got a job offer from my number 1 pick. I won't say here what company I will be working for, but I will be working in the tallest building on the West coast. It's a big relief as I will be leaving for Germany tomorrow for a World Cup game (Japan vs Australia), and I wanted to find out the answer before I was out of town for 10 days. With this job, I will be dealing a lot with Japan, so I will probably have to stay late to coordinate with their time zone. Hopefully I can still continue to cook.

It's still the asparagus season, so today I'll introduce an easy but tasty side dish using asparagus.

IN JAPANESE: Asparagus to Bacon
CATEGORY: Meat, Side dish
COOKING METHOD: Stirfry
DIFFICULTY: Medium
SERVES: 2 people
LENGTH OF TIME: 10 min

INGREDIENTS:
3-4 slices of bacon
6-8 sticks of asparagus
some shrimp (optional)
some salt and pepper

HOW TO:
Cut slices of bacon into small pieces (about half an inch wide), and cook them in a frying pan to your preference (if you like crispy bacon, then cook it long time).

While the bacon is being cooked, wash the asparagus and chop them into bite size pieces.

Add the asparagus to the pan (add the shrimp as well if you are using it), and stir fry for about 3 minutes until asparagus looks rich and green.

Season with some salt and pepper and serve.

Wednesday, May 31, 2006

Tender Pork

I had a bit of cold this past week, so I haven't had a chance to update my blog. While I was sick, my wife and I got to catch up on some of the TV shows. I have Media Center on my computer, which can operate like Tevo, so we record whatever we are interested in. It's nice since we can fastforward all the commercials. We had been going out or busy for some reason or another, so we were about 30 hours worth of TV shows behind. Nice thing about having it on my computer is that we can skip all the crap. On some shows, like American Idol, we can watch the two hour show in an hour, since we fast forward all the commercials plus any time Ryan Seacrest is speaking.

Speaking of which, the gray haired Taylor Hicks won the Idol. Some article compared to him as the PT Cruiser, he is old but he is also new. I thought that was funny. I heard that this season was better than the previous years. I enjoyed the finale with all the guests this year. Hopefully the producers can make the next season just as successful and entertaining.

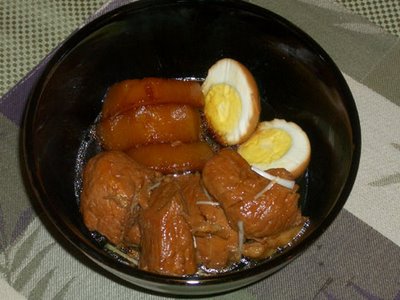
Alright, so this site is supposed to be for "easy Japanese recipes" but I think I will post some difficult recipes once in a while. When I say difficult, all that means is that it just takes more time, like butanokakuni I'm introducing today. There doesn't seem to be any official name for this dish in English, so I'm going to call it "tender pork." I read on Obachan's Kitchen & Balcony Garden blog that it's commonly called "braised pork belly" or in Hawaii called, "shoyu pork" but they didn't strike me, so I decided to choose something else. My wife used to call it "two-day pork" since the izakaya near our apartment in Yokohama advertised their kakuni as "super tender from being cooked for two days."

IN JAPANESE: buta-no-kakuni
CATEGORY: Meat
COOKING METHOD: Boiled
DIFFICULTY: Difficult
SERVES: 2 people
LENGTH OF TIME: 4 hrs
INGREDIENTS:
1 lb of big pork chunk
1 tsp oil
6 half inch pieces of ginger (see TIP: Ginger)
2 green onions (just the green parts)
1 cup of sake
1 TBsp brown sugar
1 TBsp regular white sugar
1/2 cup soy sauce
1/4 cup mirin
some daikon (optional)
2 boiled eggs (optional)

HOW TO:
Normally in Japan, people use the fatty belly part of the pork for this dish. But I find that most American people, including my wife, take the fat off when they eat. What a waste, considering that about a third of the belly meat is fat. So this time, I decided to try using a non-fatty pork part. I'm not sure how common this is, but I found a pork chunk called "country style ribs" at my supermarket, which oddly was boneless.

First cut your choice of pork into pieces. They should be about twice the bite size.

In a sauce pan, drop about a teaspoon of vegetable oil and turn the heat to medium. When the oil is hot, put the pork pieces in the pan. Rotate the pieces on all sides until they are no longer pink on the outside. Fill the pan with 2 cups of water and 1 cup of sake (I used 1/2 cup of cooking sake and 1/2 cup of real sake), and reduce the heat to low. Add pieces of ginger and green parts of the green onion as well. Don't use the lid, as the alcohol in sake needs to evaporate.

Let it simmer for 2 to 3 hours (if you have time, I recommend 3 hours, but 2 hours is fine, too). While you let it simmer, add some water every half an hour to make sure that all parts of the pork stay under the water at all times.

Tear a piece of pork after it had been cooking for 2 to 3 hours and make sure it's really tender (it should be from all that sake and cooking!!) Then take out the ginger and green onions out. If possible, take the pork pieces out, and strain the soup into a separate pan, so you will have much cleaner soup stock for the next step.

Place the pork pieces back into a pan with cleaner soup stock. If you want to add daikon and boiled eggs, this is your time to do it. Just make sure that water level is higher than your food (if not, add more water). Add 1 table spoon of brown sugar and another table spoon of regular white sugar. If you don't have brown sugar, 2 table spoons of regular sugar is fine, too. Also add 1/4 cup of soy sauce and 1/4 cup of mirin. Let it simmer on low heat for half an hour.

Add 1/4 cup more of soy sauce, and let it simmer for half an hour longer. Adding this half of soy sauce later helps pork from getting too salty from soy sauce. And the pork pieces should be mighty tender by now. You could garnish it with thinly sliced white part of the green onion like I did.

Wednesday, May 17, 2006

Yakitori

I recently noticed that beer tastes better in Japan. I'm not talking about Asahi or Sapporo tasting better than Bud or Miller (though they do, in my opinion). To be fair, let's use Heineken for example. If you order a draft of Heineken, I just think it tastes better in Japan than it does here in the States. I thought maybe it was the climate. There's nothing like an ice cold beer in a hot humid summer evening in Japan. Compared to that, Seattle, especially, doesn't have much humidity in the summer so I don't crave beer as much. But then I thought about it some more and realized that the key point was "ice cold."

Most bars and especially izakayas in Japan keep their beer mugs in a freezer, so it's icy cold when they get it out to pour your beer. Sometimes, it's so cold that you find thin ice pieces floating on top. But I noticed that majorities of restaurants, and especially bars in the US don't bother putting their beer mugs in the freezer. Usually, they are stacked up on the counter at a room temperature. If you are unlucky, sometimes your mug is fresh out of the dishwasher that it's hot! There's been a couple of times I got my beer, and I could've warmed up my hands by wrapping my hands around it. And worst of all, sometimes I can taste the detergent. What a way to ruin a good beer.

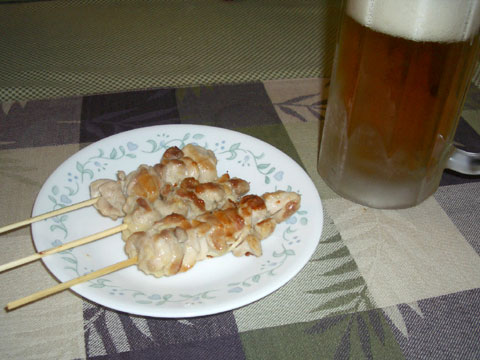
While I'm on the topic of beer, I thought I would show you how to make yakitori. It's basically grilled chicken on a stick.

IN JAPANESE: Yakitori
CATEGORY: Side-dish
COOKING METHOD: Grilled
DIFFICULTY: Medium
SERVES: 2 people
LENGTH OF TIME: 15 min

INGREDIENTS:
chicken, preferably thighs
some salt (preferably sea salt)

HOW TO:
The toughest part about cooking yakitori is chopping up chicken thighs into small pieces and putting them on a stick. I usually use thighs since they are more tender than breast meat. I normally buy a big pack of thighs, make bunch of sticks, and freeze them.

Yakitori will taste the best if you grill it over charcoal, but if you have something like George Foreman Grill, that would work as well (though it won't have that grill flavor!)

There are two common ways to flavor yakitori; sea salt or teriyaki sauce. Most hardcore yakitori fans (like my wife and I) tend to prefer salt, because it simply goes better with beer. Whatever is your preferece, put some salt or sauce on the chicken, and then start grilling.

Rotate the chicken about every 2 minutes. It can take a while to cook in between the pieces, so I normally create a bit of spaces between each pieces to speed up the process.